It just isn’t Halloween until you make some edible body parts to share, and these Ghoulishly Green Eyeball Cake Pops are the perfect creepy party treat. The insides of these pops are an easy mixture (use a box cake mix and canned frosting) of blood Red Velvet Cake mixed with Cream Cheese Frosting.
The outside is a candy coating in a sickly green color and the iris and pupils are painted on with a tiny paint brush and food coloring (saw this idea in the October issue of Food & Wine Magazine). You could also use some M & M’s for easy eyeballs too.
I placed some of my eyeballs on sticks (cause everything tastes better on a stick!) and some I placed into tiny Halloween theme cups filled with candy. The eyeballs rest creepily on top of the candy watching your every move. Either way, all eyes will be on you when you serve these fun treats! Here is how you can make your own.
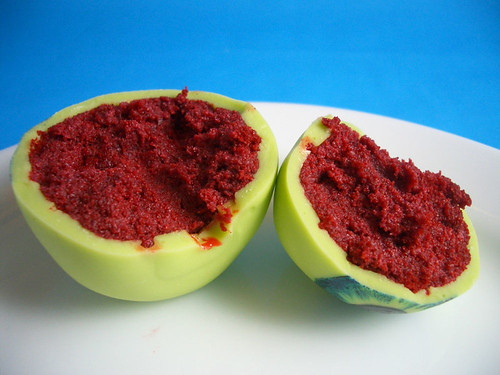
Keep it fast and simple by using a Red Velvet box cake mix and Cream Cheese canned frosting. You could use any flavor cake and frosting you like but the bright red of the Red Velvet Cake looks extra creepy when you bite into the eyeballs!
Bake the cake according to the directions on the box and let cool completely before crumbling into a large bowl. Scoop about 1/2 the can of frosting into the crumbled cake and mix with your hands until a “dough” comes together.
Using a cookie scoop (I used a #24 scoop for monster-size eyeballs!) shape the dough into balls, place on a cookie sheet and freeze for around 30 minutes to make them firm enough to stay on a stick.
While the balls are chilling, melt the candy melts in a small bowl over barely simmering water. (I used two 12 oz. bags of Wilton Vibrant Green Candy Melts). If the candy needs to be a little more fluid, add a few of drops of vegetable oil and mix well. When the candy is completely smooth you are ready to dip!
Take a stick and dip the end into the melted candy then stick into the bottom of the cake ball. Dip the ball and cover all the cake and the top of the stick with candy coating and transfer to a stand to dry. Repeat with all cake balls.
If you are not using a stick, dunk the cake ball into the melted candy and transfer to a parchment or Silpat lined baking sheet to dry. You can place the coated cake balls in the fridge to dry faster.
When all candy is set, paint on a “pupil” with a thin paint brush and some black food coloring. Use another color and paint an “iris” around the pupil. Continue until all cake balls have become “eyeballs”.
Serve on a cake pop stand or place the eyeballs in tiny candy cups filled with candy corn. Keep eyeballs in the fridge until ready to serve.
Want more news, sent to your inbox every day? Then how about subscribing to our email newsletter? Here’s why we think you should. Come on, give it a try.


