I am always on the lookout for something different and unique in baking, and when I came across the idea for these Stained-Glass Sugar Cookie Spiderwebs and Spiders I knew I’d found the perfect Halloween treat.
I won’t lie – these were definitely difficult and time consuming but you have to admit that they look pretty cool hanging from a branch for a fun Halloween cookie display (my clever dad suspended the branch from a chandelier with some fishing line!).
I found the basic idea for these cookies in a fabulous book called Ultimate Cookies by Julia Usher. This book is jam packed with terrific baking ideas, techniques and lots of pictures to get you inspired!
The recipe calls for using a candy making ingredient called isomalt crystals to create the shimmery stained-glass spider webs. Isomalt is difficult to find outside of a specialty baking store so I decided to use crushed Jolly Rancher Candies to achieve the same effect without the hassle. For a nice creepy green color I chose the Sour Green Apple Jolly Rancher. Here is how you can make your own:
You will need a large and small spider web cookie cutter or you can print out a design from a computer and trace around with a knife like I did.
You will also need a bag of Sour Green Apple Jolly Ranchers that will be pulverized in a food processor or in a plastic bag using a mallet.
The legs of the spider are made of shoe-lace licorice (you can find wheels of licorice at Cost Plus Stores in the candy section) cut into 2″ lengths and the eyes are green mini-M&M’s topped with a yellow cookie sprinkle glued on with black royal icing. The “hair” on the spider is chocolate sprinkles.
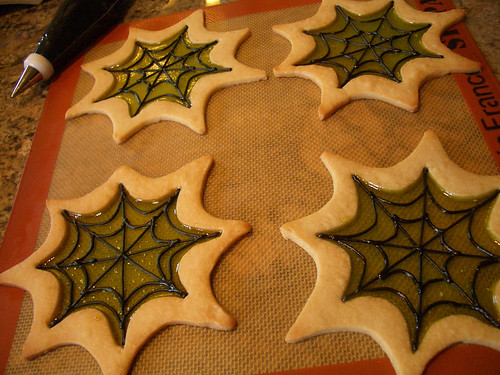
Spider Web Cookies and Spiders: Start with a standard sugar cookie recipe rolled out to 1/8″ thick (This is my favorite cut-out sugar cookie recipe) and cut out the spider webs.
When all the webs are cut, carefully cut out the center of each web. Cut out a round circle for the spider that goes on each web. If your webs are around 6″ then the spiders should be around 1 1/2″ round.
Freeze all the cutouts and preheat the oven to 350 degrees. Line a baking sheet with Silpat or parchment. Set aside.
When oven is heated bake the cookies for around 10 minutes or until just browning then remove from oven and let cool off but do not turn off oven.
When cool to the touch, carefully fill the hole in the web cookie with the crushed Jolly Rancher candies. Return to oven and bake until the candy is completely melted but not boiling, another 2-4 minutes.
Remove from oven and let cool completely before removing from pan. Finish baking all the webs and spiders and let cool completely.

Icing: Make a thick batch of Royal Icing and tint it black. I like to use dark cocoa powder to start off my black icing then add the black food coloring. This uses less food coloring and makes the icing taste better.
Fill a piping bag with some of the black icing and fit it with a small round piping tip. Set aside.
Place the remaining icing in a bowl and cover with plastic wrap until ready to use. When the cookies are cooled, pipe a web on to the stained-glass of the spider web cookie. Set aside to dry.
If you want to attach a string to the cookies for hanging, carefully turn the webs over and glue the string to the back of the web cookie using the black royal icing.
When all webs are finished, take a spider cookie and dunk into the bowl of black icing, covering the tops and sides of the cookie. Place on parchment paper and quickly start “gluing” the licorice spider legs onto the body of the spider with additional icing.
Cover tops of spider with chocolate sprinkles to look like “spider hair”. Pipe a dot of black icing onto the spider bodies and glue the eyes onto the spider.
Let spider and webs set for several hours to dry. When the spider legs are “set,” carefully loosen the spiders from parchment paper. Pipe a large blob of black royal icing onto the spider web where you will be attaching the spider.
Press the spider carefully but firmly into the black royal icing. When all spiders have been attached to their webs set aside and let dry for 24 hours or overnight to harden completely.
The next morning your spider webs are ready for hanging or packaging! Remember: the stain-glass candy in the center of the cookie becomes sticky quickly as it absorbs moisture from the air. You will definitely want to use these cookies within a day or so of making them.
Want more news, sent to your inbox every day? Then how about subscribing to our email newsletter? Here’s why we think you should. Come on, give it a try.


