Happy Almost Halloween! Today i’ve got two great Halloween Treats that are fun for all ages and really pretty easy to make.
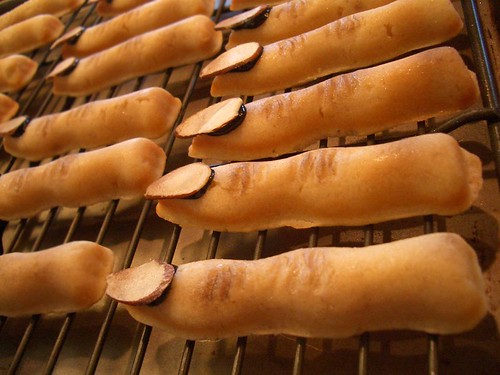
The Halloween Witches’ Fingers are made of a simple sugar cookie dough that is pressed into a mold to resemble witches’ fingers.
Once baked, the “fingers” are dusted with a little cocoa powder to give them an eerie aged appearance while sliced almonds create the perfect “fingernail” dusted with a little gold pearl dust and dipped into cocoa powder to create that “just dug out of six feet of dirt” look that is oh so festive!
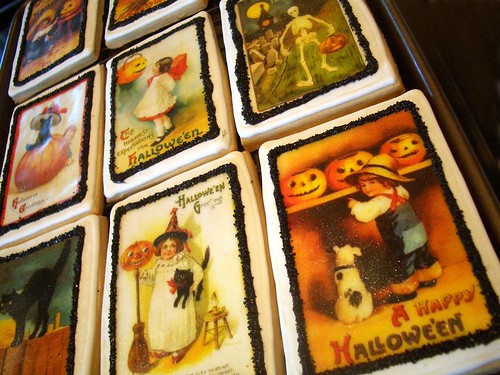
Next is the Edible Vintage Halloween Postcard Cookies. These cookies are made with an edible wafer paper that is printed with edible ink in these amazing vintage halloween postcard designs.
The simple sugar cookies are baked into a rectangle shape, iced in royal icing and then topped with the wafer paper designs. Each cookie is further embellished with a dusting of gold pearl dust for an antique luster and a frame of black sparkling sugar for even more shine.
Both of these Halloween confections are terrific party desserts, place-cards for a sit down dinner or even bagged up as individual party gifts for guests. You can really let your creative imagination go wild with these cookies: how about green witches’ fingers with orange and purple fingernails? How about adhering the wafer paper designs to chocolate bars instead of cookies?
The ideas are endless, here is how you can get started on your own ghoulish creations:
Both cookies start with one basic sugar cookie dough. Once the dough is mixed, divide the dough roughly in half. Cover half the dough with plastic wrap and set aside.
Witch’s Fingers’ Cookies: Preheat oven to 350 degrees. You will need a Witch’s Finger Cookie Pan, also found at Sur La Table and Michael’s Crafts.
Using a number 70 cookie scoop, scoop out a ball of dough (roughly 19 grams) for each finger. Roll the ball into a cigar shape and press down firmly into the mold.
Fill all cavities on the mold and bake for 9 to 10 minutes or until lightly brown around the edges. Let cookies cool in pan for five minutes then turn out onto a wire rack to cool completely.
Once cookies are cooled, dust each finger lightly with cocoa powder to help accentuate the ridges and hollows of the finger. Dust the fingers with a bit of gold pearl dust for an eerie sheen.
Take a sliced almond and dust with a little of the gold pearl dust and dip into cocoa powder to look like dirt. I used a few silvered almonds that were “chipped” for an extra creepy effect.
Affix the “nail” to the “finger” with some black or green Sparkle Gel. Make sure to let some of the gel ooze out around the nail for a nice “decomposed” look. Let the fingers dry completely before packaging or displaying.
Edible Vintage Halloween Postcard Cookies: Preheat oven to 350 degrees. Line cookie sheet with parchment or Silpat, set aside.
You will need a package of Halloween Vintage Postcards Wafter Papers. Roll out remaining dough to approximately 1/4 inch thick. Cut out rectangle size that will fit the wafer paper designs, I used a 3 1/2″ x 5″ cutter for my cookies.
Freeze all cut out rectangles for 30 minutes to overnight before baking. Bake frozen cookies for 12-15 minutes or until edges start to turn golden brown.
Let cookies cool completely on wire rack before decorating. When cookies are cooled, pipe white Royal Icing over the entire top of the cookie, this will be the background for the wafer paper designs.
Let the icing dry overnight. The next day cut out the wafer paper designs. On top of a clean paper towel, brush some corn syrup on to the back of the wafer design and “glue” the design to the top of the iced cookie.
Use a clean paper towel for each design to avoid getting corn syrup on the front of the designs. Place all finished cookies upside down on a piece of parchment paper or Silpat and let dry for 30 minutes.
Once cookies are dry, brush entire cookie with gold pearl dust for an antique sheen. Pipe an edge around each design with the Sparkle Gel that was used for the Witchs’ Finger Cookies.
Sprinkle black sparkling sugar over the gel and then brush off excess sugar. Let cookies dry completely before packaging or serving.
Want more news, sent to your inbox every day? Then how about subscribing to our email newsletter? Here’s why we think you should. Come on, give it a try.


